
Using concrete models to support children’s writing development
By Kim Clancey
When I was a child it seemed that the washing machine was always breaking down. In a family with five children, a broken washing machine created quite a problem. My mother complained and made the phone calls for repairs.
My father, fed up with the complaining and waiting for the repairs to be made, decided to disassemble the darn thing himself and figure it out. His plan was to figure out the parts, how they work, how they connect, and put it back together with a new understanding that he now “got” it and could do it himself.
Years later, I was having a similar situation with my writing workshop and the narrative pieces my students were writing. It seemed that although I had all the working parts and ran it like an efficient machine, I was constantly doing the same work over and over, teaching and reteaching, explaining and reexplaining, doing that same load of laundry over and over. Like my dad, I too became fed-up with the situation, and began an investigation into how I might better teach my young writers in a manner that fit their developmental needs. I tried my father’s approach: take it apart, learn about the parts, and put it back together with a better understanding.
Rediscovering the basics
In looking at my students’ writing it seemed that most of them were what I called “Fell off the Cliff Writers.” This type of writer starts off enthusiastically, a great idea takes shape on the first page, but enthusiasm dwindles as they turn to page two where I would find some sentences followed by the words: THE END, in big bold letters. A message that under no uncertain terms indicated they were done.
Perhaps they might fix a few capital letters or a spelling error, add in a period or two, but the writing was done. I wondered why that was the case. Why did enthusiasm fade? Why did this story not go on any further? Could it be they didn’t know how?
I revisited the work of Jean Piaget and his theory of cognitive development. During this time, I was teaching a second grade class ranging in age from 7 to 9. This places them at Piaget’s concrete operational stage, meaning their need to see concrete objects is of primary importance to fully understand concepts.
My writing expectations for them were not concrete. The books I read were concrete, yet the transfer of a genre style written by an author to them writing in this genre was not concrete. In my teaching of genres, we spent days listening to examples, making note of the characteristics. Charts were posted and books displayed. Students knew the qualities of the various genres and could name a few examples, but did that mean they could write in that genre? I know what lots of things are and what they are made of, that doesn’t mean I can make them!
I began to think about ways that I might bridge that gap between knowing what something is and knowing how to make it. I found the answer right in front of me, counting cubes and BRIO blocks. I wondered if my students and I might be able to take apart a narrative mentor text, figure out the parts and their function, and build a concrete model of what a narrative story looks like that they could then use to apply to their own narrative writing.
Make the model
Rummaging through mentor texts, that is, text that we can turn to again and again for different instructional purposes. I selected Ezra Jack Keats’ The Snowy Day and began to do the work that I wanted my students to do.
I read closely to spot words that might signal to me a new part was beginning. The pattern emerged as I noticed it was transition words such as “After breakfast,” “then he went into his warm house,” and “he went to sleep.” I circled what I thought were the different parts and then decided to let my class give it a try.
There is great beauty in allowing your students to try and figure something out when you are trying to figure it out yourself. Their minds are more flexible and they often spot things you didn’t notice and make you smarter in the process. Moving out of my comfort zone, I provided the class with a copy of The Snowy Day text and with partners they began to take the text apart, coloring the different sections as they went along. They then made models with counting cubes using different colors for the different sections.
Rather than simply naming them the beginning, middle and end, they came up with names much better than I would have, such as Set the Stage, The Action, The Exhausting Part, and The Grand Finale. As they looked at their models and transferred them to drawings, it became evident that the story had different parts, and the middle or The Exhausting Part, was actually the most developed. Was this the case in other narrative books we read? Our investigation progressed as we pulled out one of our favorites, Knuffle Bunny.
Mo Willems’ story of Trixie’s trip to the laundromat with her dad and the loss of her favorite stuffed animal, Knuffle Bunny mimicked the same pattern of transition words to signal a new part. Again providing students with the typed text of the book, they colored the sections they felt went together and we came up with a basic model consisting of five cubes each of a different color.
Now I wanted these young writers to see that each part of the story or model had different lengths and purposes. I wrote the words to Knuffle Bunny on chart paper and working in groups, students colored the parts they had identified, each with its own specific color. We had five parts so there were five colors. We then cut the story parts up by color and posted them.
What became visually apparent was that the parts were different sizes. As a classroom community we named these five parts and using this large visual model, we revised our basic five-cube model to reflect the different sizes of each section. The cube model grew from five colored cubes to a model of three that were yellow, two orange, seven green, three purple, and two red. With a model in their hands, students could see concretely that stories have different parts of varying length.
What is the purpose of different parts?
Now that we visually could see the parts, our next job was to investigate the purpose of these sections and how they were written.
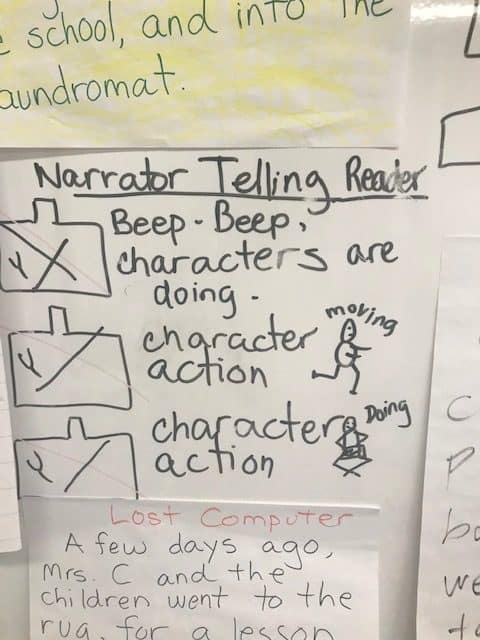
Closely reading each colored section, students came away with a big idea of what each part was meant to tell the reader. For example: the yellow part introduced the characters and told the reader what they were doing, the orange part described the actions involved in doing that act, the long green part was the problem and the details involved, the purple part was the cleanup—as my students named it, reflecting that the problem was being solved—and the red part was the ending. We named our parts based on what we noticed they did in the story and moved in even closer to now look at how Mo Willems wrote each part.
I teach my students two basic types of sentences: a talking sentence and a telling sentence. A telling sentence is the narrator telling the story. This type of sentence tells the reader a character’s movements, feelings or thoughts. Talking sentences are dialogue, which in Mo Willems’ books are in words in the text and speech bubbles.
On the wall where the five parts were posted and named, we listed the different types of sentences used in each section cube by cube. This display now contained a vast amount of visual information for students to see, touch, point to and discuss. Students could visually see the different parts, their varied lengths, their function, the types of sentences used in writting, and physically hold in their hands colorful models matching this display.
Create a shared story
Writing is a tricky subject to teach. Perhaps this is why so many teachers tell me they dislike writing time. Look back on your experience learning to write. Perhaps, like me, you remember a Fun Friday. “Write whatever you want!” my teacher would say providing no instruction. This is like playing an instrument without receiving lessons. You don’t get any better.
Perhaps, like my spouse, you remember it more as handwriting lessons and diagramming sentences. No wonder he hates to write!
I wish that a teacher along my writing journey had taught me how writers do it. That is what I want to teach my students. In other subjects, such as math, you all work on a similar problem before working one independently. Writing, by contrast, is tricky because the stories children write are often individual events that occurred outside of school. We rarely have a shared experience to work on together. This is why I create a shared story that occurs right in front of them. The purpose of this arranged scenario is to provide a shared experience that the class and I can all write about to model the process of using the cubes as a planning and drafting tool.
I enlist the help of others and their acting skills to assist me with this tool. I have asked the school secretary, guidance counselor, former students, and my principal.
Ideas I have used include:
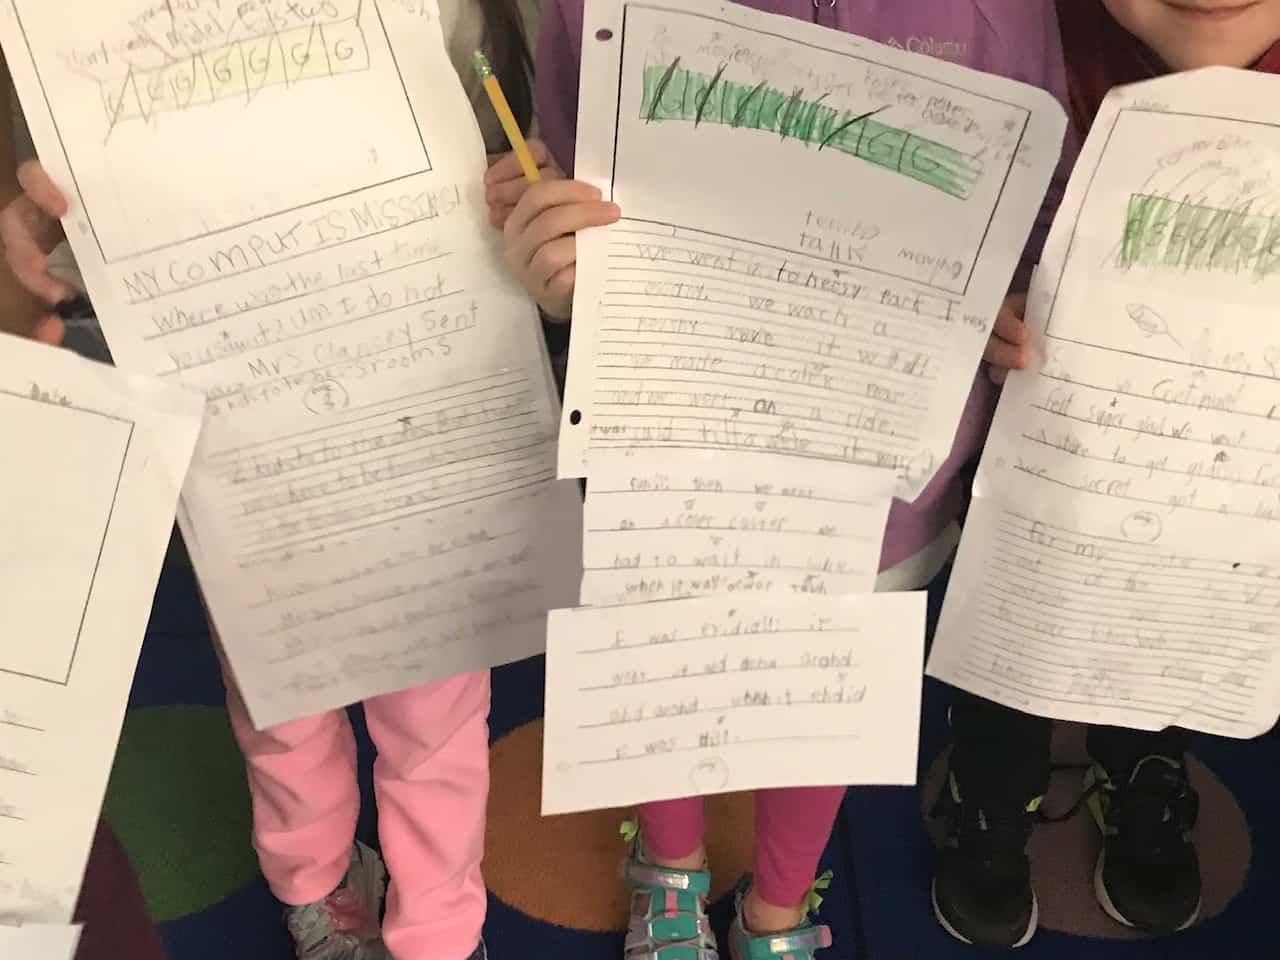
• I tell the children I have misplaced my computer and I am going to get in trouble with the main office. I lead the class on a hunt throughout the school retracing my steps. I send a few students off to ask other teachers if perhaps I left it in their room. These teachers, not knowing that this is all a play for the sake of writing, genuinely tell the children they have not seen it, and the students run back to tell me. Eventually, I run into my principal who is in on it, and she directs me to bring my computer to her office as we need to review work. I feign fear! Upon returning to the classroom and close to tears, I go to get some tissues and when I open up the closet door I find my computer! The students are so happy for me.
• Another story involved our school guidance counselor who comes in for her lesson only to be interrupted by my continuously ringing phone. Mrs. L is nice at first, but eventually loses her temper when the phone rings for a third time. Using a “give that to me voice,” she grabs my phone and in front of the class shows me how to fix it while I apologize profusely. She returns to her lesson stating, “Okay where were we before all those interruptions,” only to have her phone start ringing. The children find this hilarious. I actually had one student comment aloud to the class, “Hey, we should write this story.” Mrs. L, who was in on the whole thing, and I share a wink—mission accomplished.
• One of my former student’s favorites is when I ask them to come in for the animal avalanche story. In this scenario they enter during a lesson and ask if they might borrow one of my stuffed animals placed high up on a shelf. I excuse myself from the lesson and go to the animals. Reaching I gently pull once or twice. Trying again, I give a big tug and all the animals fall on my head. A stuffed animal avalanche! They love writing this one as they think seeing their teacher pummeled by plummeting stuffed animals is priceless.
• A colleague of mine created a story of not being able to find her lunch and eventually she located it when she sat on it in front of the class. Oh, the sacrifices we make!
We can then use this whole class experience as a shared writing activity applying the cube model to learn more.
Let’s write
Now that we have our shared story idea and models, I hang five large sheets of paper similar to writing paper students use. This paper contains a planning box and lines to write on.
In the planning boxes I draw the cubes matching the model, each page representing a different color. Similar to when we tell a story across our fingers, now we tell it across our cubes using the model. I demonstrate how I tell the story following the outlines we have made and pull a cube off for each part I tell. I remind them of the steps I took and point out that everything is posted for them to use.
With a partner, students tell the story pulling the cubes as they go. We repeat the storytelling, but this time as they pull the cubes. I touch the cubes and identify the corresponding cubes on the paper to make the connection that the cube model is the same as the cubes on the writing paper.
In the next few days, we will move to telling the story from more concrete to less concrete ways:
1. Telling the story across our cube models.
2. Touching the cube model but telling the story on the paper.
3. Touching-telling-and labeling in words or pictures, rather than cubes, on the writing paper.
4. Touching-telling-and-using our planning pictures or words.
5. Drafting the sentences.
As we write each sentence using talking or telling sentences, we cross off a cube. At the longer sections, students need to be reminded of the ways they can use the cubes and in doing so include details or dialogue they would not have included otherwise. It was working. Their writing was developing!
Moving to individual writing ideas and publishing
As these young writers began to understand the structure of a narrative story, they eventually applied this model representation to their own writing ideas. Following the same steps, they develop their story ideas in similar patterns using the cubes as they go.
Revision and editing lessons reflect those from the unit and writing needs of students.
Eventually moving to publishing, students tape a piece of paper over the planning box and draw their final illustrations. This is an efficient way to publish as it allows teachers, students and others to see all the steps taken in the writing process. As children reflect on their writing, they can look back on the labeled cubes, the writing, and flip down the paper to have colorful illustrations that added even more context and interest to their pieces.
I have since taken this method to help young writers learn about story leads, story endings and mentor sentences. We have delved deeper into the shapes of stories and made models of informational and opinion writing. Recently, I had the opportunity to share this with many educators at the Paramus Public Schools Summer Institute on the Teaching of Literacy. It was met with excitement and enthusiasm to give it a try.
It seems my father did know best. Deciding to take something apart to figure out how it works so you can then reassemble it with a better understanding, is a worthwhile idea and one that can be applied to more than a washing machine. It is a process that I will continue to investigate in my teaching journey so that I might be the type of writing teacher I wish I had.
Kim Clancey is the 2021-22 Bergen County Teacher of the Year. She is a staff developer and teacher coach in Paramus where she teaches second graders at Ridge Ranch Elementary School. She can be reached at kimc122003@gmail.com.